当 Swift 编译器删除了标准库中的代码 - 记修复 Swift 6 中的冗余 Load 指令消除优化器
最新更新:苹果已接受该问题的修复。最终解决方案在相关代码所有者 review 后进行了调整。
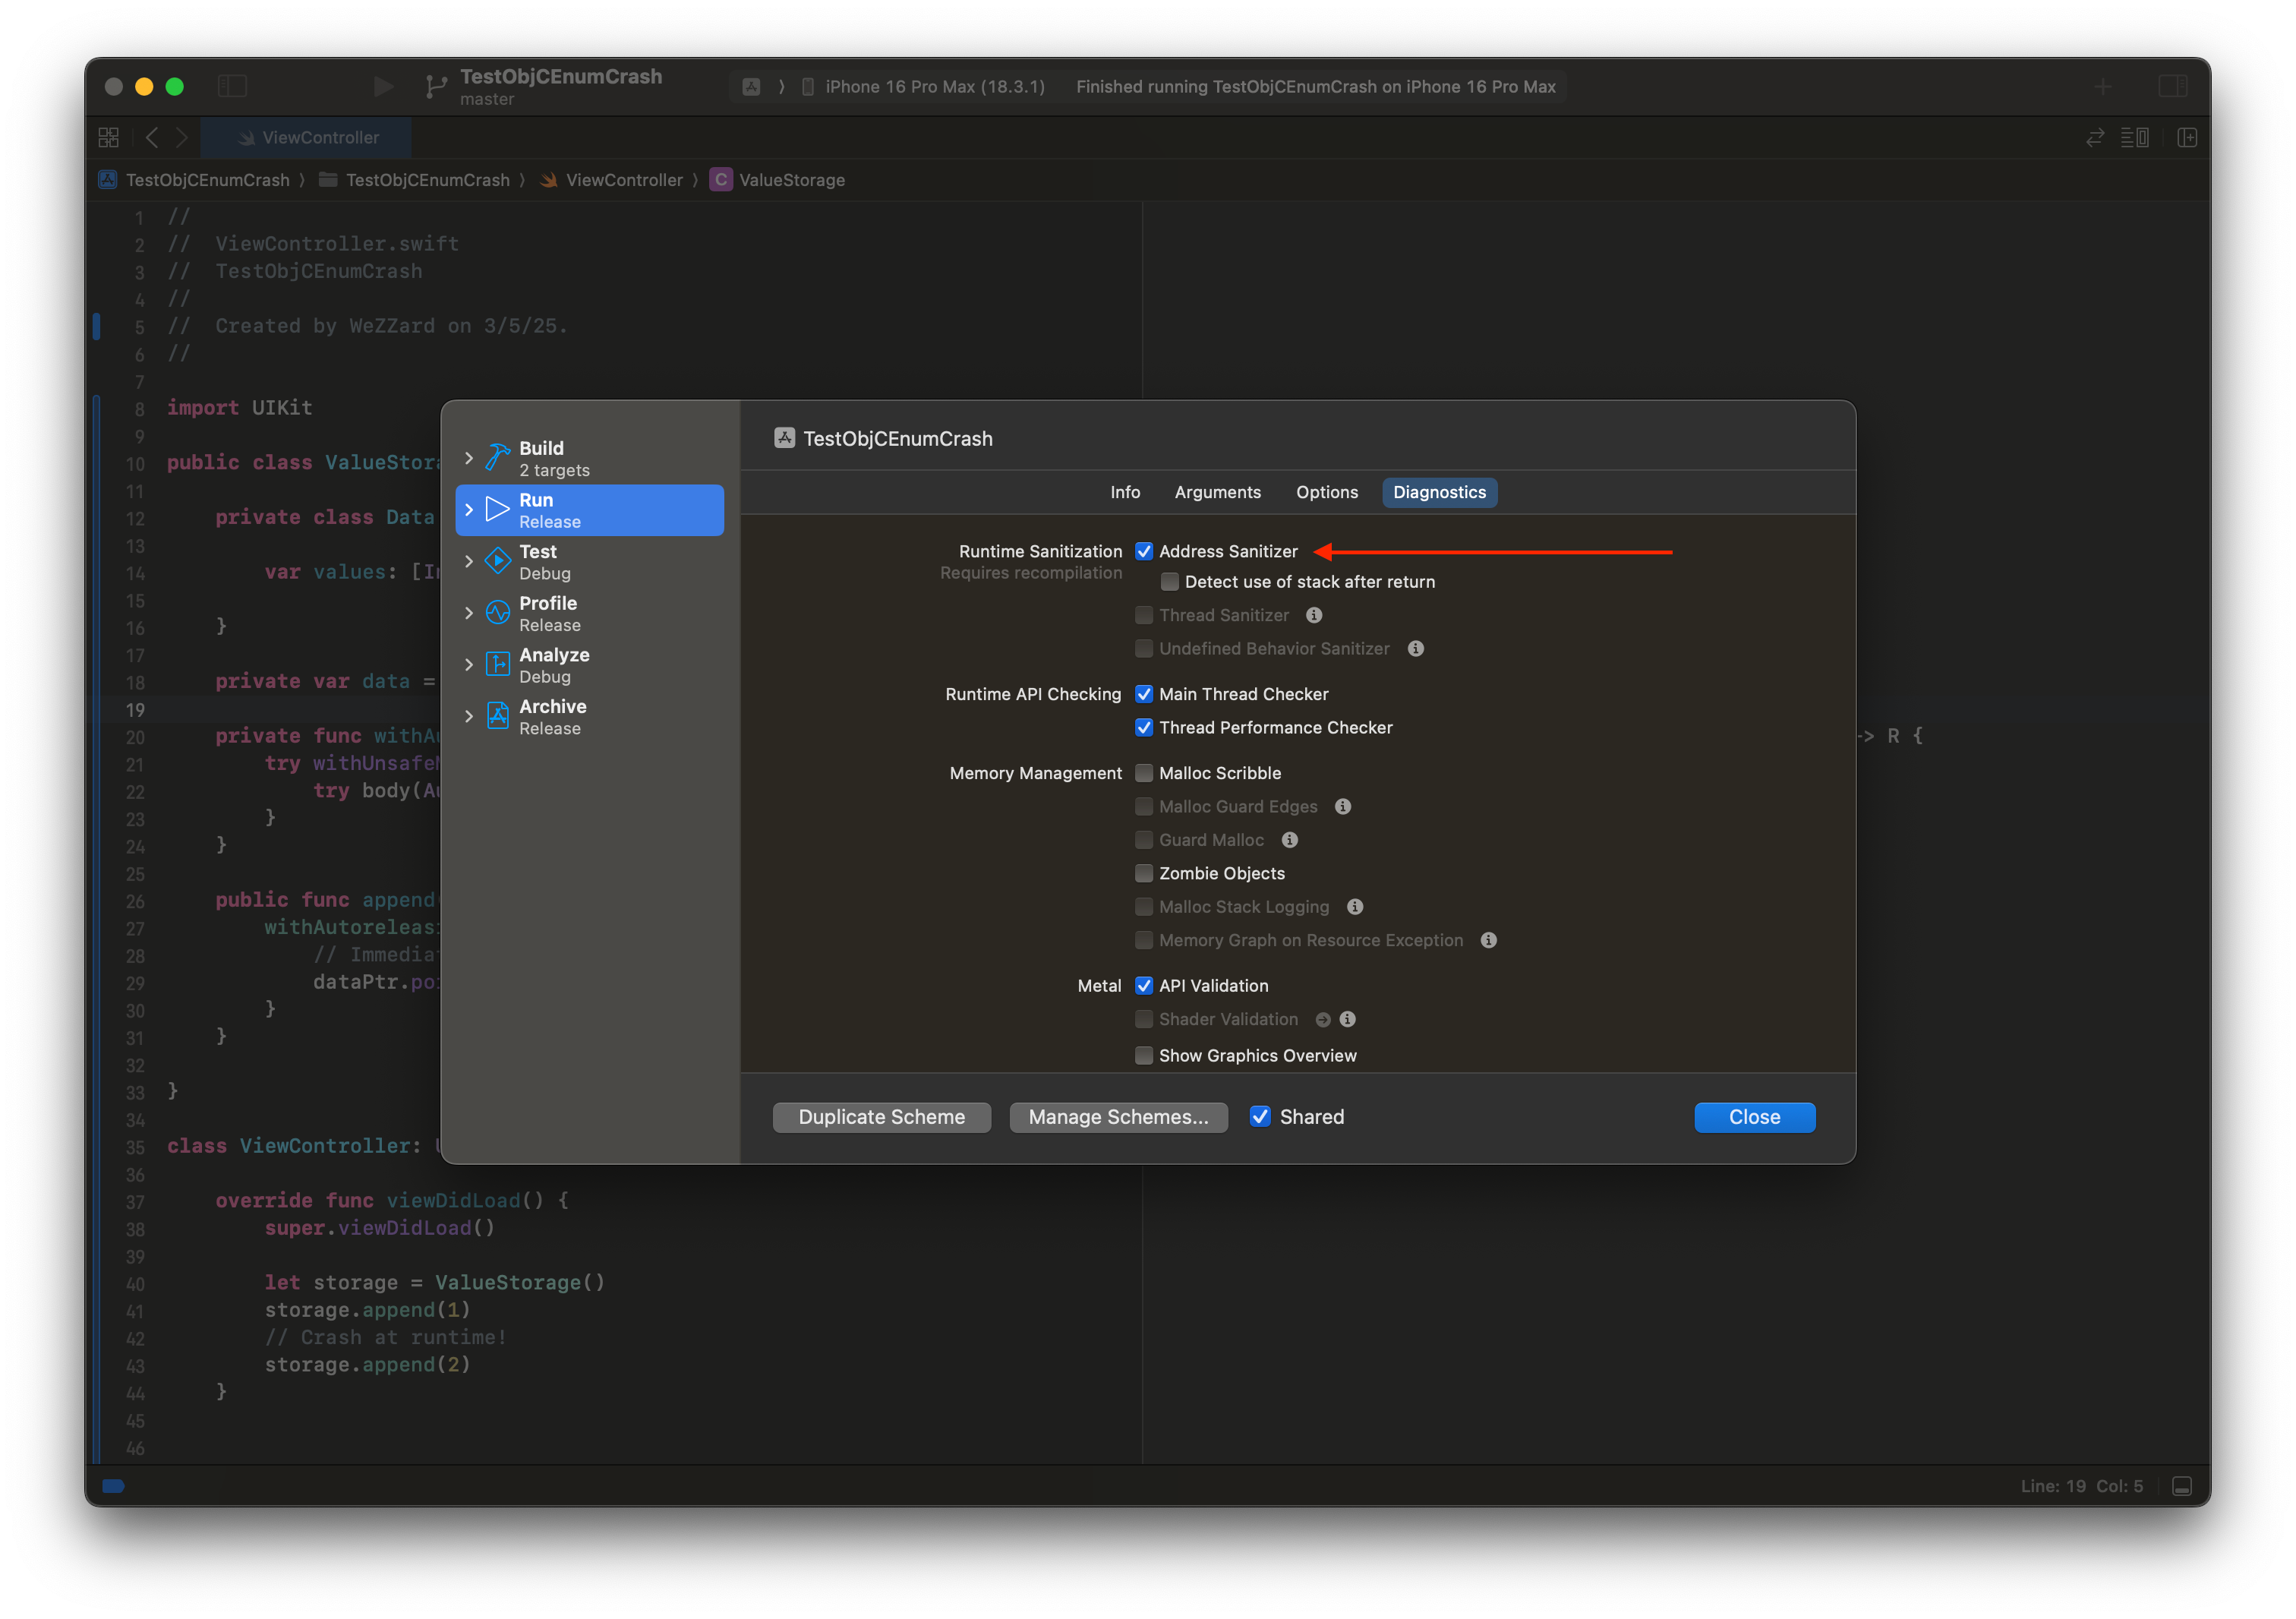
蛇年春节假期前,一位同事向我展示了一个由 use-after-free(释放后使用)错误导致的神秘崩溃。最近,我有时间深入研究这个问题,并发现崩溃是由 Swift 编译器的错误编译引起的。下面是最小复现代码,必须使用 -Osize
优化级别编译。我们可以通过在编译过程中启用地址检查器(address sanitizer)来检测 use-after-free 问题。
swift
let storage = ValueStorage()storage.append(1)// 运行时崩溃!storage.append(2)public class ValueStorage {private class Data {var values: [Int] = []}private var data = Data()private func withAutoreleasingUnsafeMutableData<R>(_ body: (_ dataPtr: AutoreleasingUnsafeMutablePointer<Data>) throws -> R) rethrows -> R {try withUnsafeMutablePointer(to: &data) { pointer intry body(AutoreleasingUnsafeMutablePointer(pointer))}}public func append(_ value: Int) {withAutoreleasingUnsafeMutableData { dataPtr in// 立即崩溃的行dataPtr.pointee.values.append(value)}}}
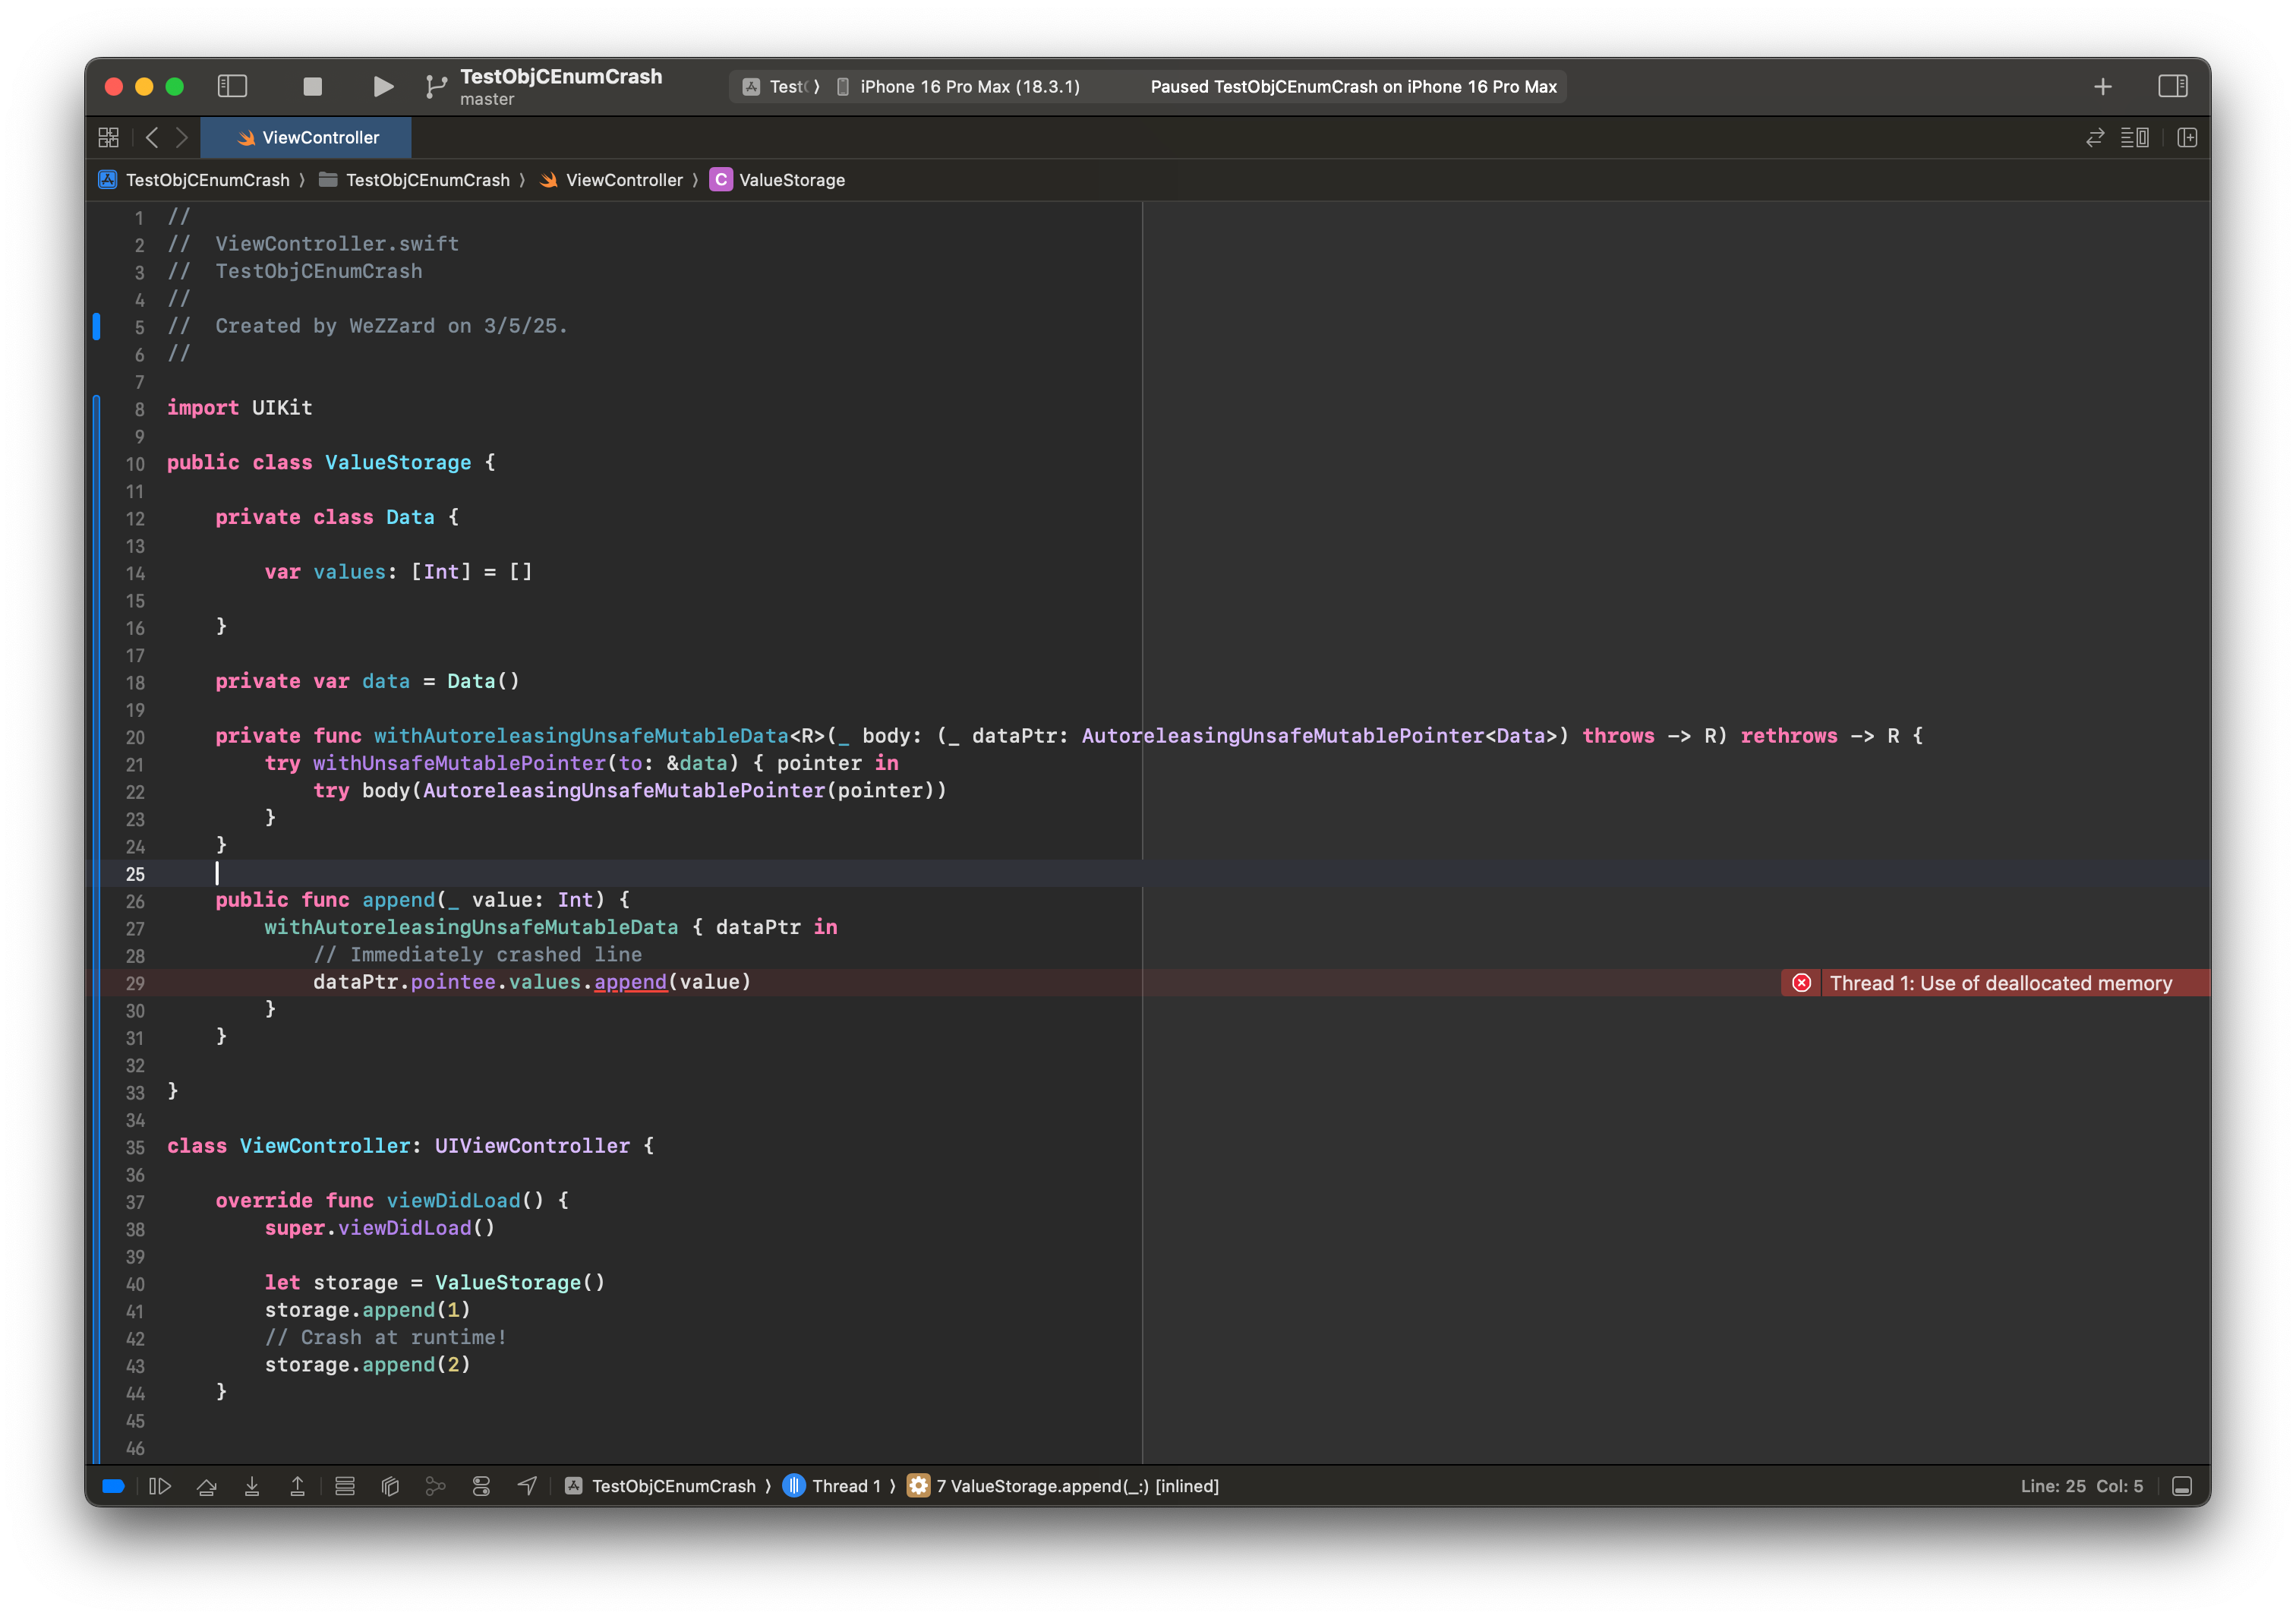
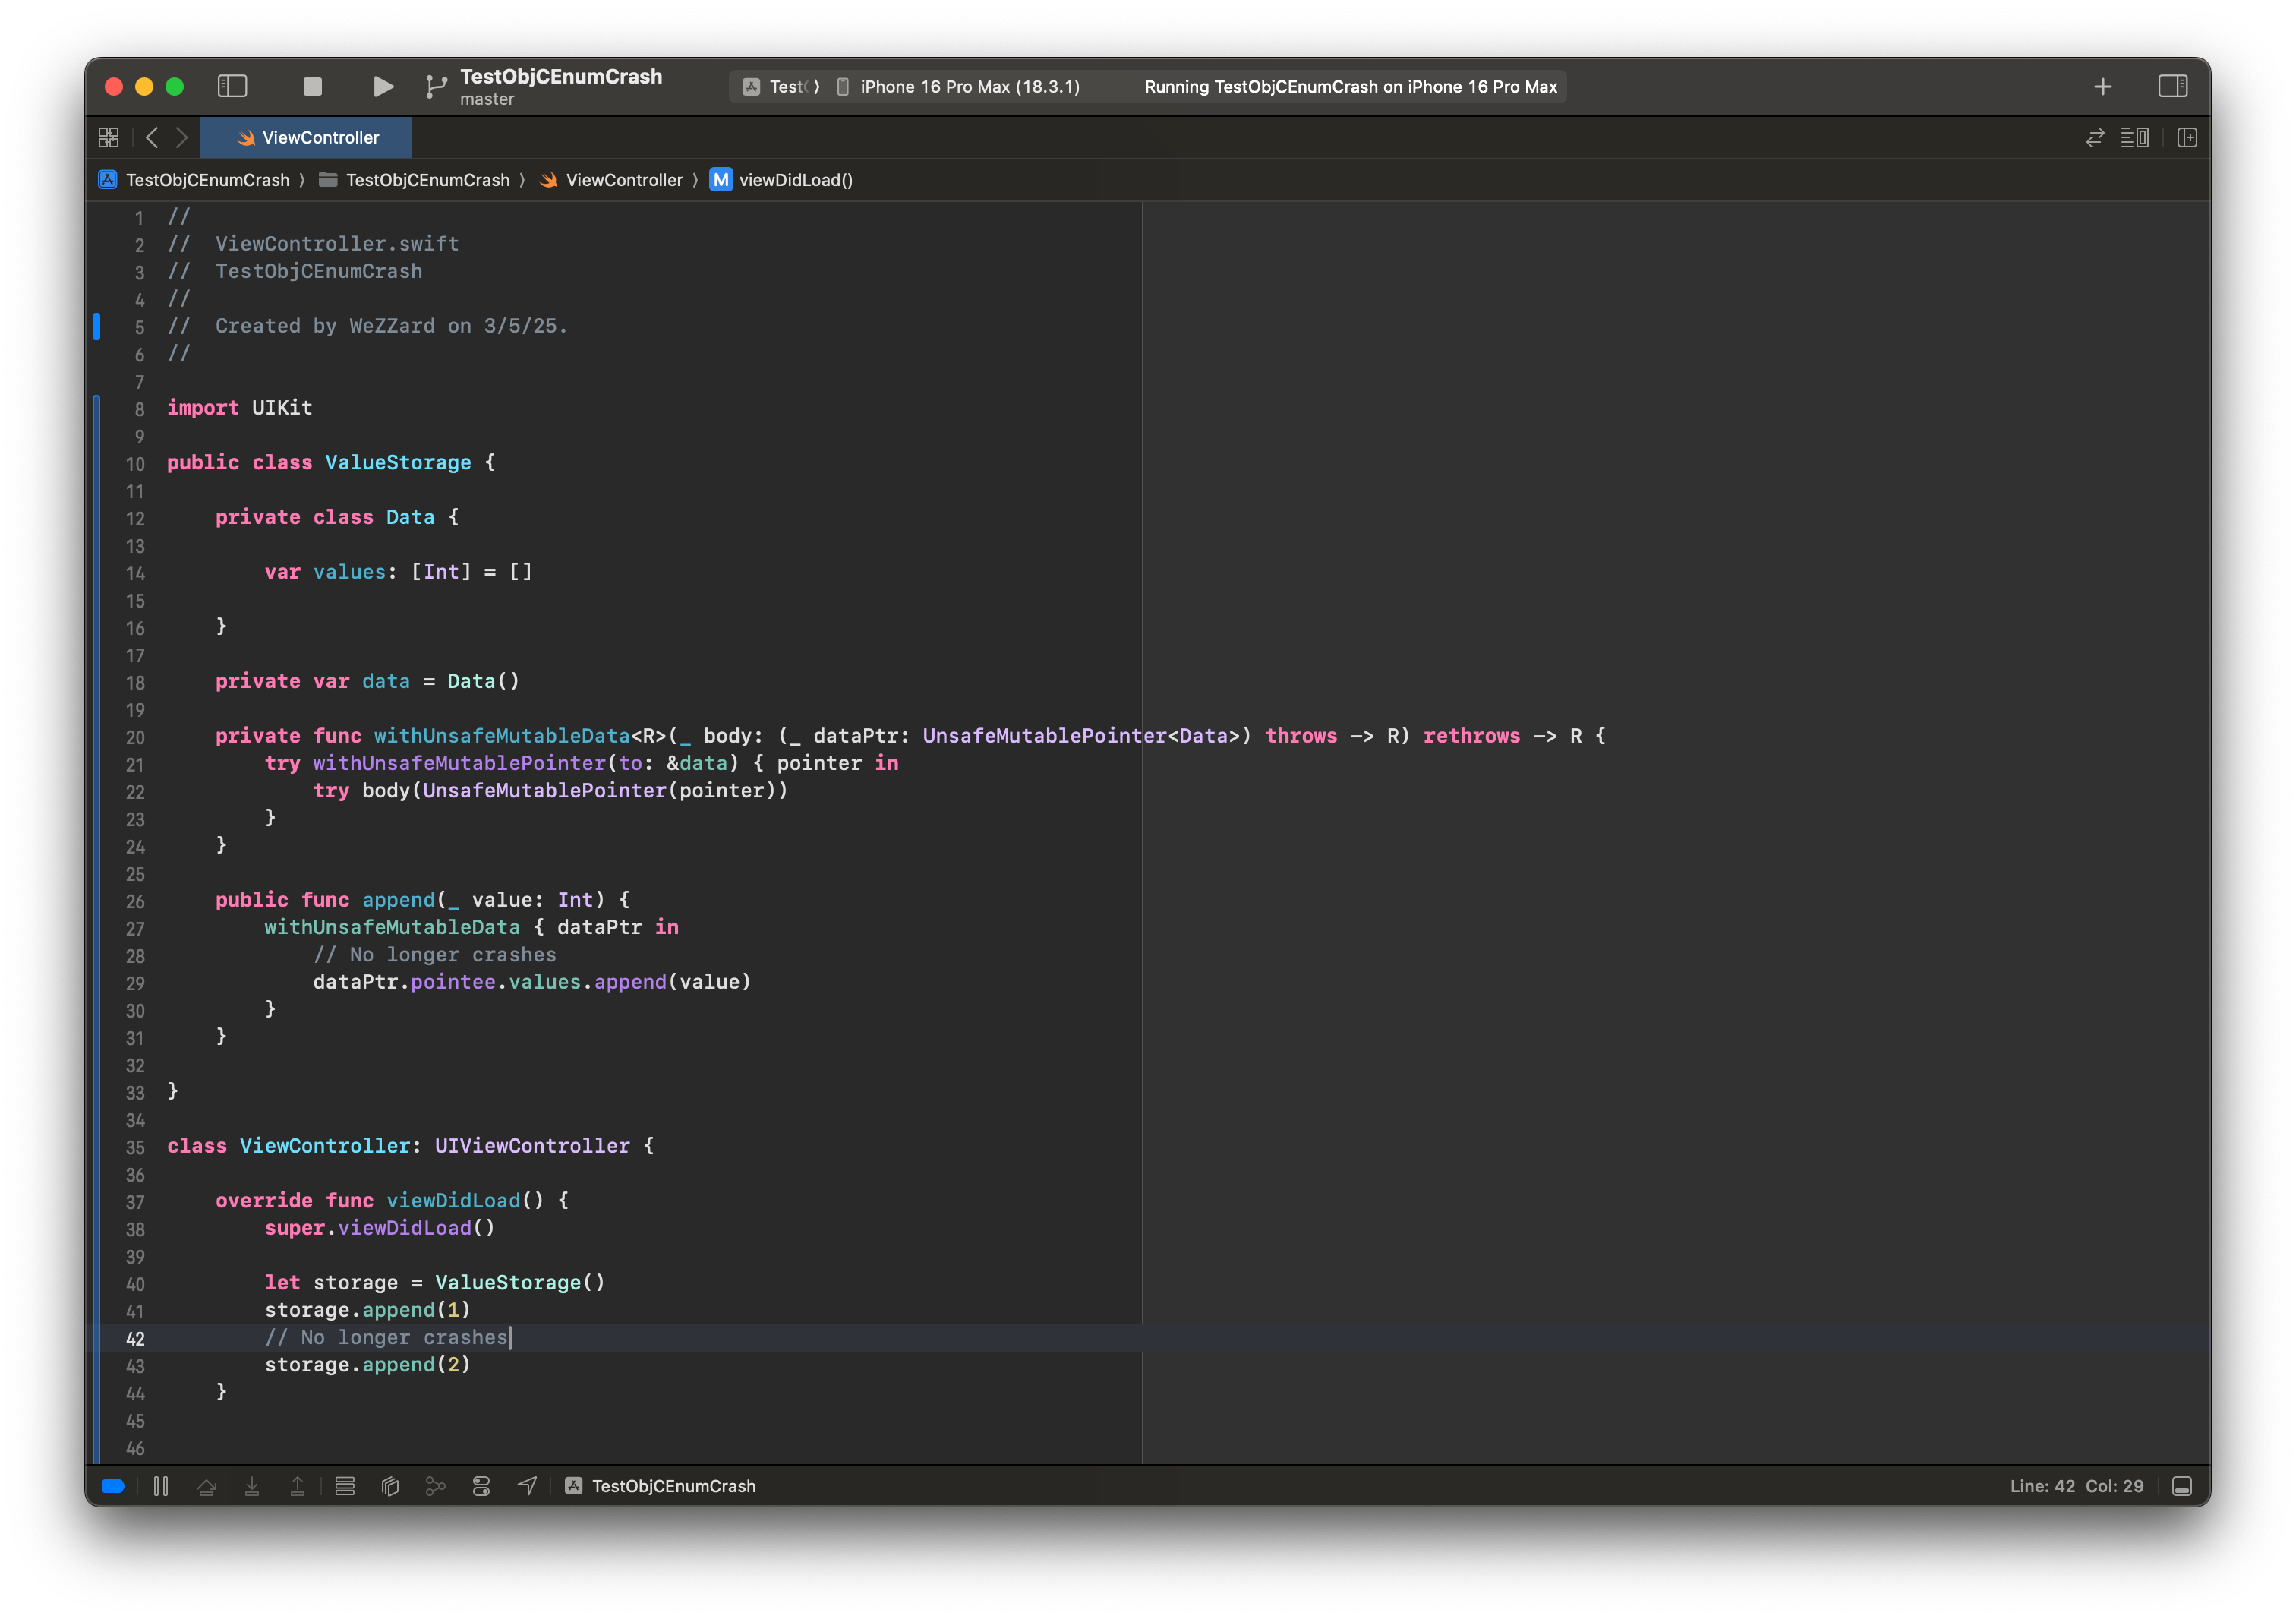
有趣的是,将 AutoreleasingUnsafeMutablePointer
替换为 UnsafeMutablePointer
可以解决这个问题。
调查崩溃现场
反汇编有问题的程序后,我们可以发现 Array
的追加函数内联到了 ValueStorage.append
函数中。关键问题是程序在 Array
重新分配后没有重新获取 Array
的缓冲区对象。这导致使用寄存器 r12
计算的地址指向旧缓冲区(如果确实发生了重新分配)。这段反汇编代码可以被简化为:
asm
; 将 `self.values: [Int]` 加载到 r12mov r15, qword [r13 + 0x10]; r14 现在是 `self.values: [Int]`mov r14, r15; 将 Array 的缓冲区对象加载到 r12mov r12, qword [r14 + 0x10]; 重新分配,可能释放旧缓冲区对象call Swift.Array._reserveCapacityAssumingUniqueBuffer; 将新计数设置到旧缓冲区对象; use-after-free(释放后使用)发生mov qword [r12 + 0x10] rax
以下是 ValueStorage.append
的完整反汇编代码:
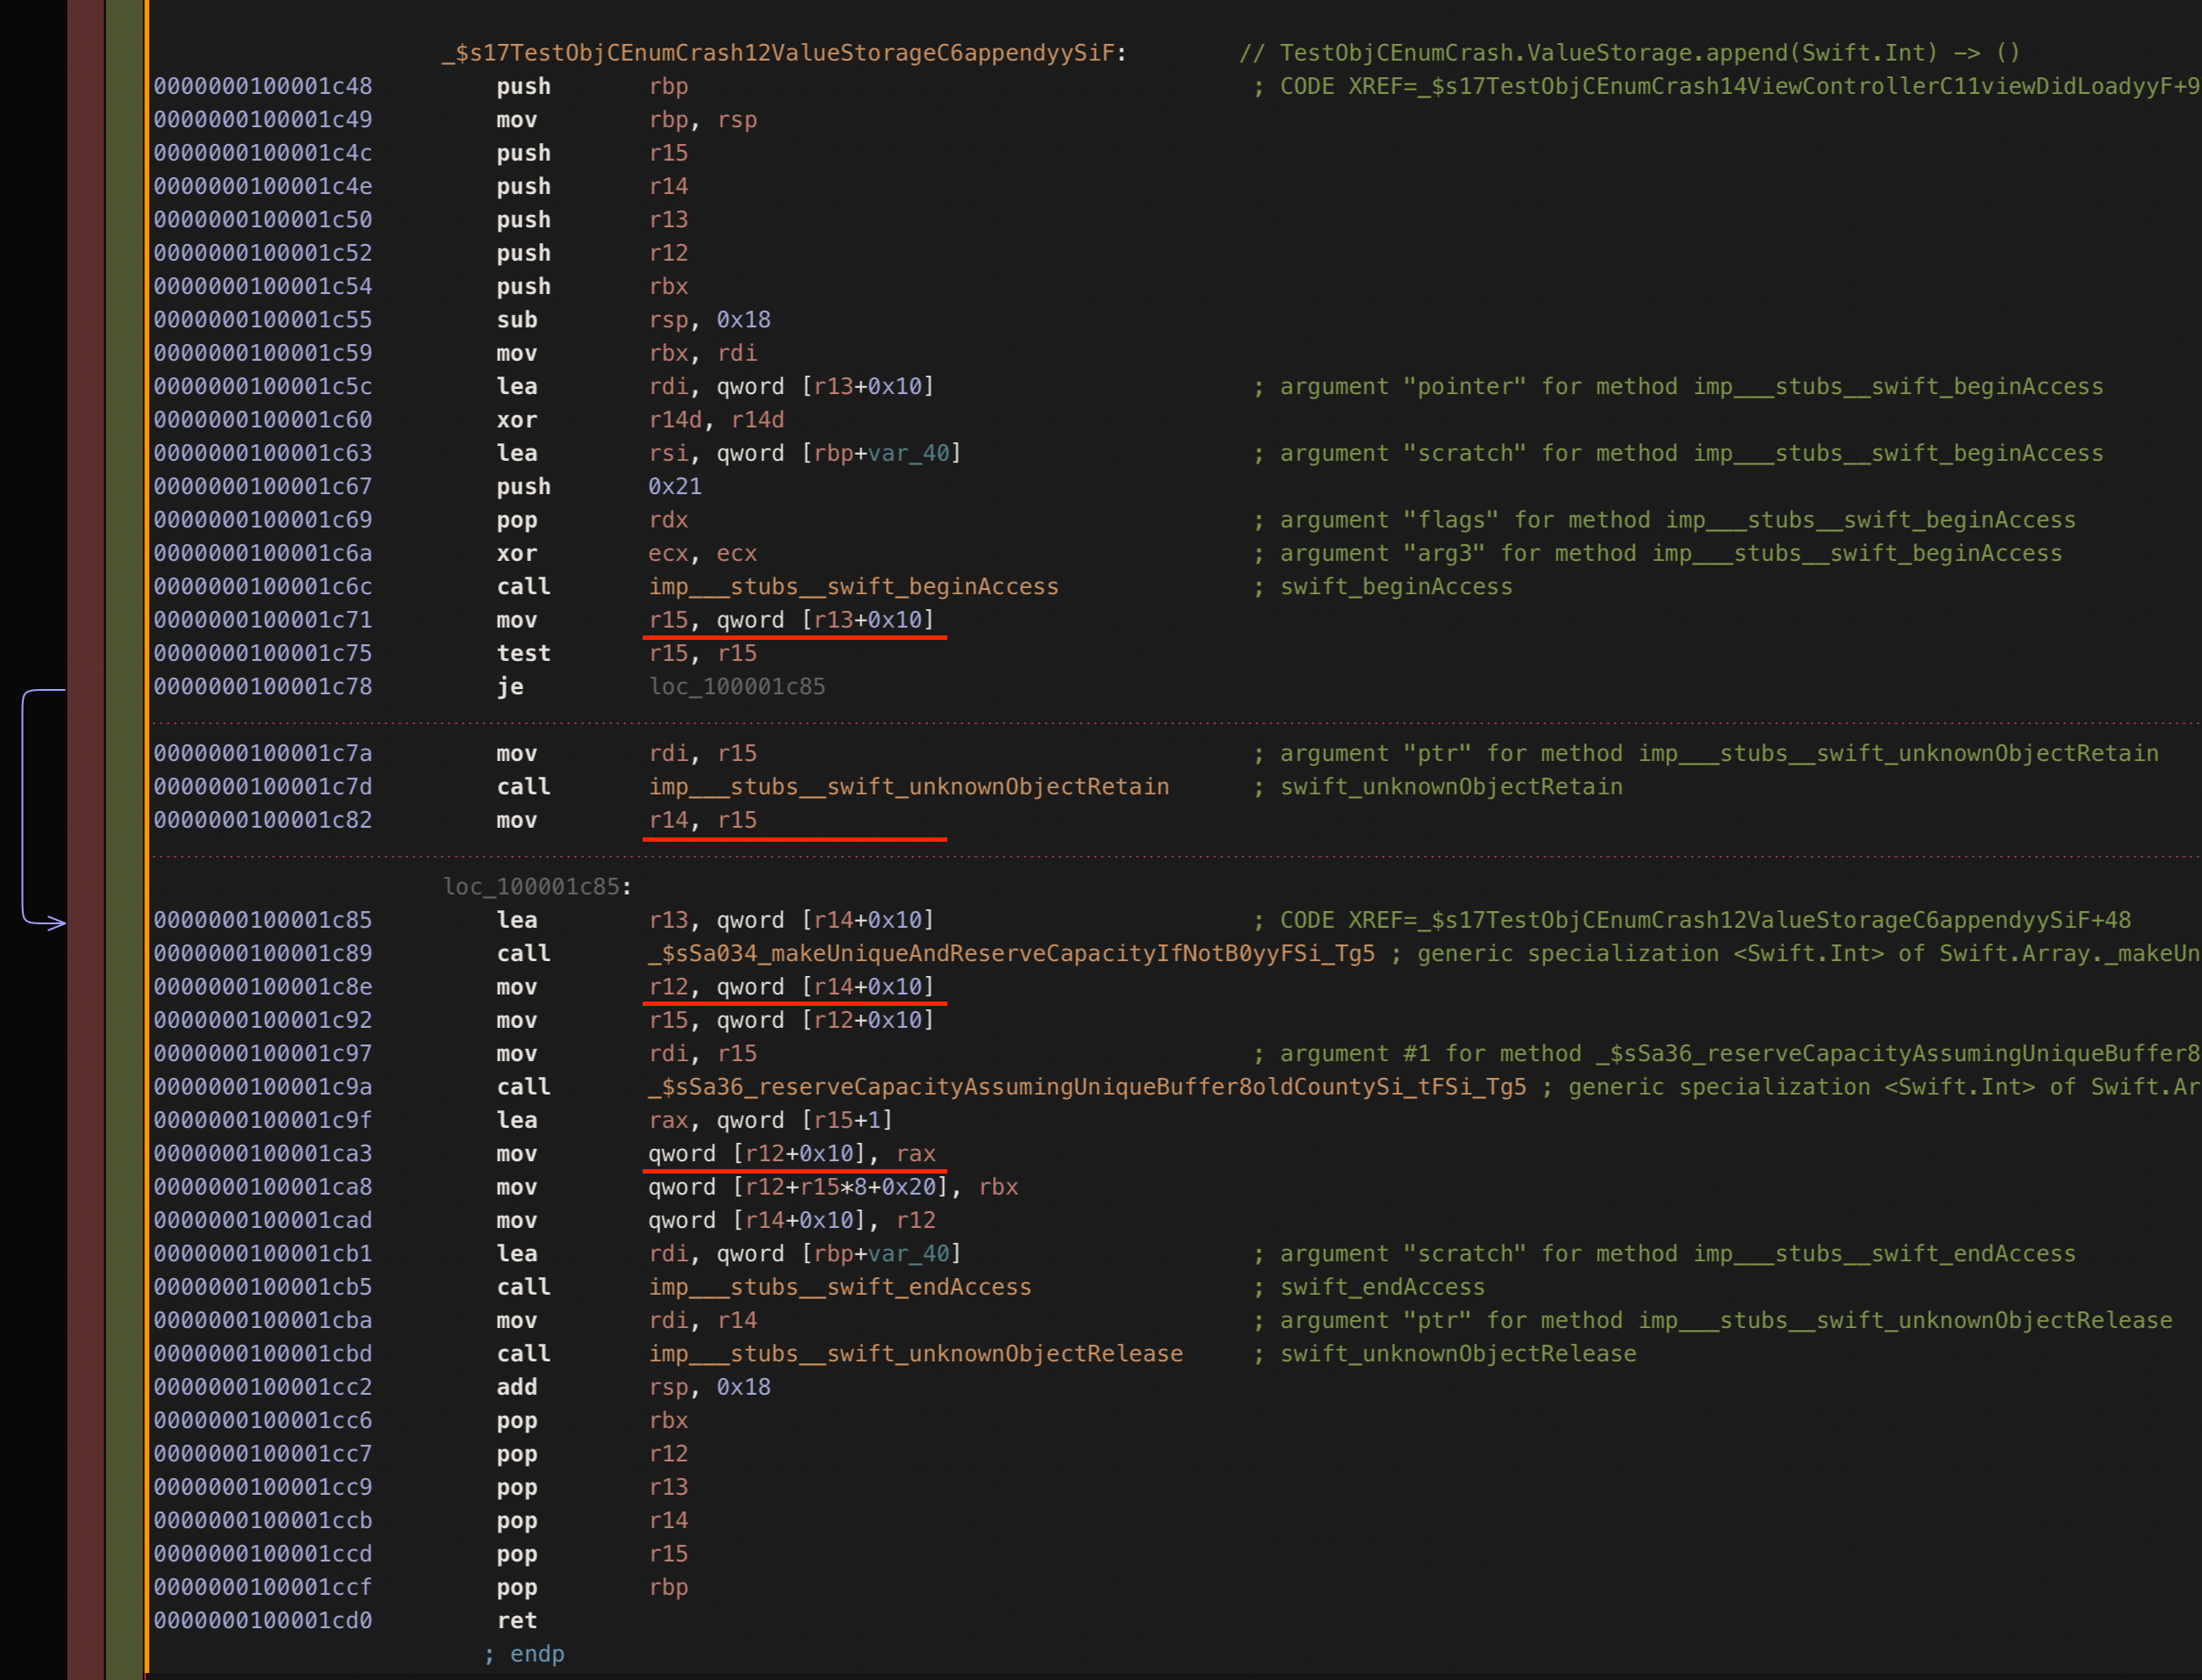
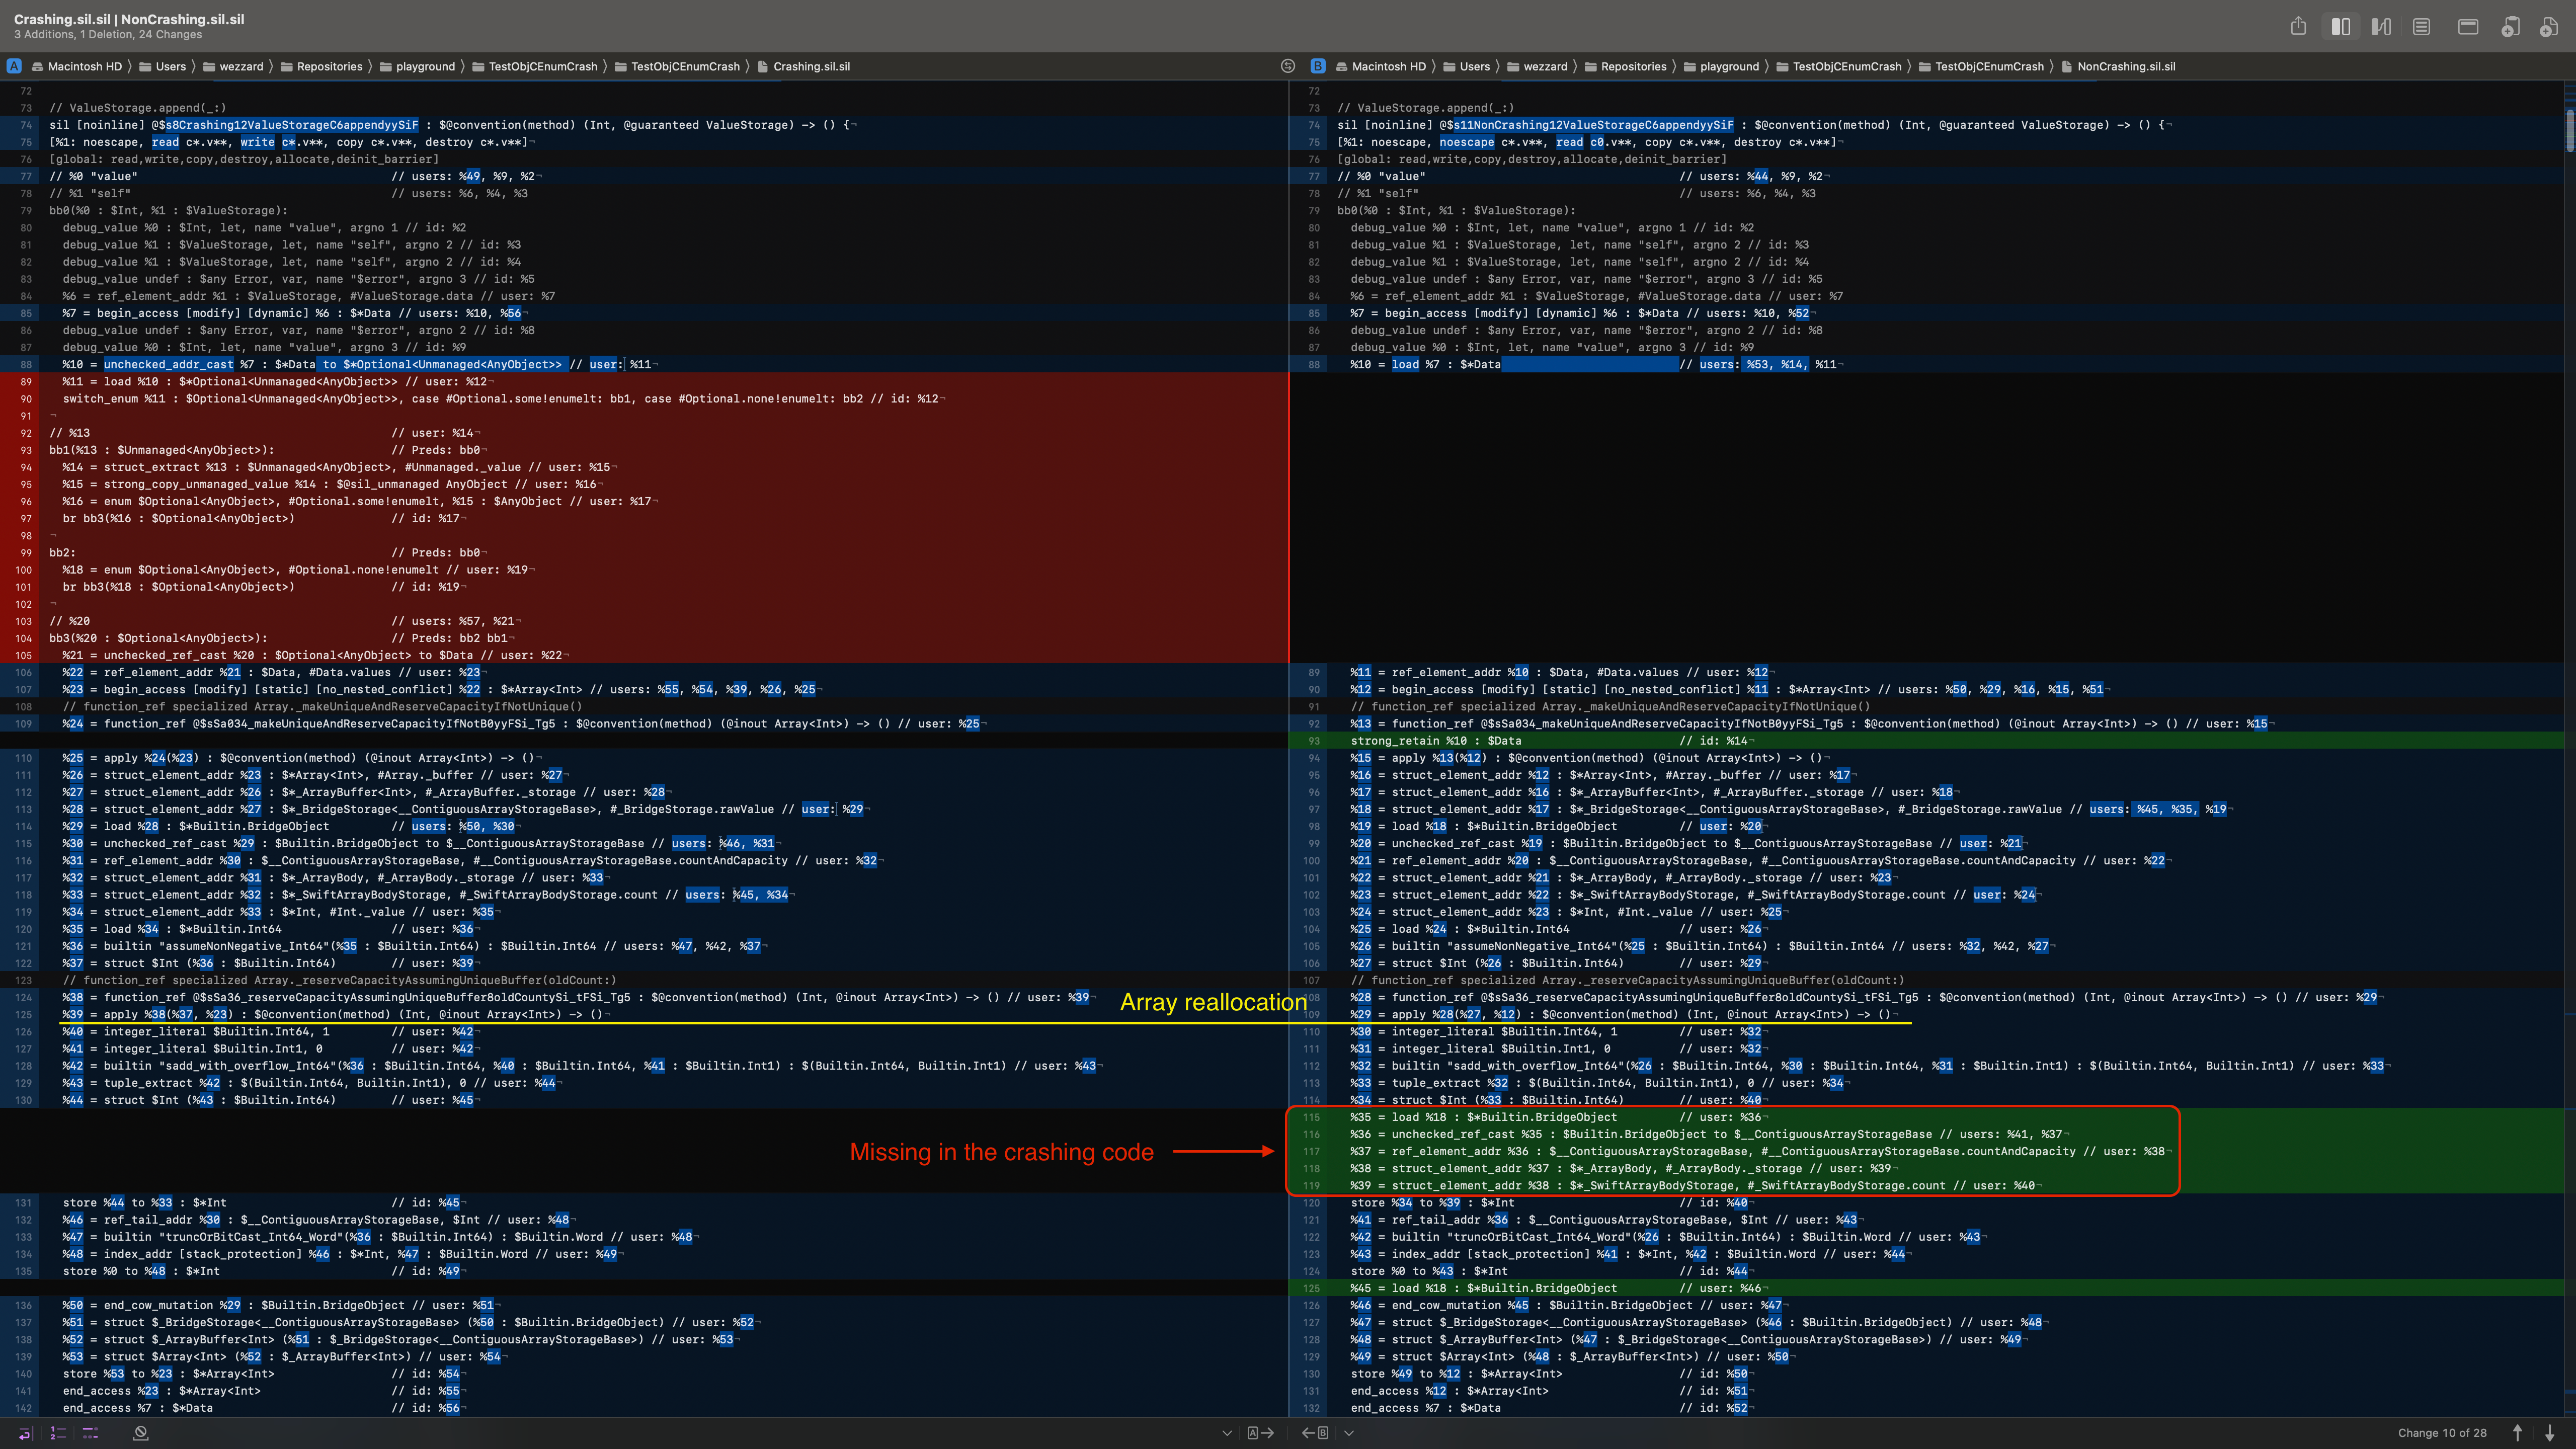
检查 Swift 标准库代码发现,其实际上是通过访问 self
上的 _buffer
属性来更新元素计数并插入新元素,而不是使用现有的旧缓冲区变量。Swift 编译器错误地删除了目标代码中重新获取 _buffer
对象的操作。
swift
// 标准库中的实现@inlinable@_semantics("array.mutate_unknown")@_effects(notEscaping self.**)internal mutating func _appendElementAssumeUniqueAndCapacity(_ oldCount: Int,newElement: __owned Element) {// 使用 `self` 上的 `_buffer`_buffer.mutableCount = oldCount &+ 1// 使用 `self` 上的 `_buffer`(_buffer.mutableFirstElementAddress + oldCount).initialize(to: newElement)}// 可能产生生成目标代码的假想实现@inlinable@_semantics("array.mutate_unknown")@_effects(notEscaping self.**)internal mutating func _appendElementAssumeUniqueAndCapacity(_ oldCount: Int,newElement: __owned Element// 显式重用旧缓冲区oldBufer: _Buffer) {// 使用 `oldBuffer`oldBufer.mutableCount = oldCount &+ 1(oldBufer.mutableFirstElementAddress + oldCount).initialize(to: newElement)}
为什么 Swift 编译器删除了代码?
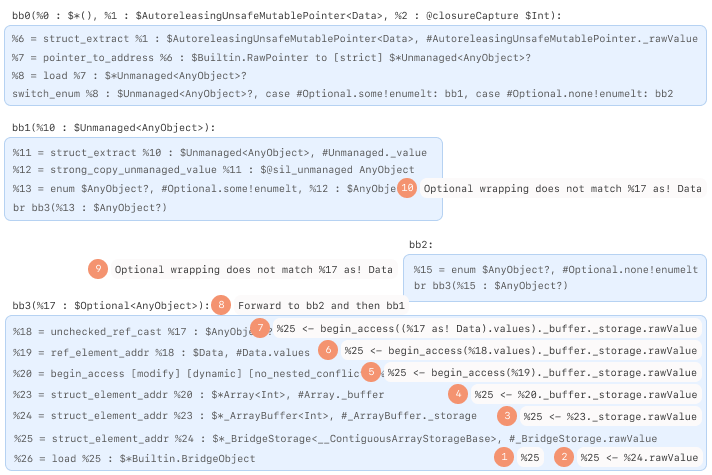
通过检查中间编译产物,我们可以在"优化 SIL"输出中找到初始错误编译,这可以通过在调用 swiftc
时添加 -emit-sil
参数获得。比较使用 AutoreleasingUnsafeMutablePointer
(左侧)和 UnsafeMutablePointer
(右侧)程序的优化 SIL,我们发现使用 AutoreleasingUnsafeMutablePointer
时,数组存储的关键 load
指令缺失。
为了确定哪个编译器过程移除了这个 load
指令,我们可以使用 -Xllvm
参数启用编译器中的调试打印。具体来说,我们可以使用 --sil-print-function
让编译器在每次有修改时打印指定函数的 SIL:
shell
swiftc YOUR_SWIFT_SOURCE.swift -Osize \-Xllvm '--sil-print-function=$MangledSwiftFunctionName'
此分析的关键日志可总结为:
sil
*** SIL function after #10338, stage MidLevel,Function, pass 37: CSE (cse)// closure #1 in ValueStorage.append(_:)...sil private @$s8Crashing12ValueStorageC6appendyySiFySAyAA4Data33_A856358C389441A2F6EA224BB743344FLLCGXEfU_ : $@convention(thin) @substituted <τ_0_0> (AutoreleasingUnsafeMutablePointer<Data>, Int) -> (@out τ_0_0, @error any Error) for <()> {...bb3(%17 : $Optional<AnyObject>):...%26 = load %25 : $*Builtin.BridgeObject...%35 = function_ref @$sSa36_reserveCapacityAssumingUniqueBuffer8oldCountySi_tFSi_Tg5 : $@convention(method) (Int, @inout Array<Int>) -> () // user: %36%36 = apply %35(%34, %20) : $@convention(method) (Int, @inout Array<Int>) -> ()...// load 指令仍然存在%42 = load %25 : $*Builtin.BridgeObject%43 = unchecked_ref_cast %42 : $Builtin.BridgeObject to $__ContiguousArrayStorageBase%44 = ref_element_addr %43 : $__ContiguousArrayStorageBase, #__ContiguousArrayStorageBase.countAndCapacity%45 = struct_element_addr %44 : $*_ArrayBody, #_ArrayBody._storage%46 = struct_element_addr %45 : $*_SwiftArrayBodyStorage, #_SwiftArrayBodyStorage.countstore %41 to %46 : $*Int*** SIL function after #10339, stage MidLevel,Function, pass 38: RedundantLoadElimination (redundant-load-elimination)// closure #1 in ValueStorage.append(_:)...sil private @$s8Crashing12ValueStorageC6appendyySiFySAyAA4Data33_A856358C389441A2F6EA224BB743344FLLCGXEfU_ : $@convention(thin) @substituted <τ_0_0> (AutoreleasingUnsafeMutablePointer<Data>, Int) -> (@out τ_0_0, @error any Error) for <()> {...bb3(%17 : $Optional<AnyObject>):...%26 = load %25 : $*Builtin.BridgeObject...%35 = function_ref @$sSa36_reserveCapacityAssumingUniqueBuffer8oldCountySi_tFSi_Tg5 : $@convention(method) (Int, @inout Array<Int>) -> ()%36 = apply %35(%34, %20) : $@convention(method) (Int, @inout Array<Int>) -> ()...// load 指令被消除了%42 = unchecked_ref_cast %26 : $Builtin.BridgeObject to $__ContiguousArrayStorageBase%43 = ref_element_addr %42 : $__ContiguousArrayStorageBase, #__ContiguousArrayStorageBase.countAndCapacity%44 = struct_element_addr %43 : $*_ArrayBody, #_ArrayBody._storage%45 = struct_element_addr %44 : $*_SwiftArrayBodyStorage, #_SwiftArrayBodyStorage.countstore %41 to %45 : $*Int
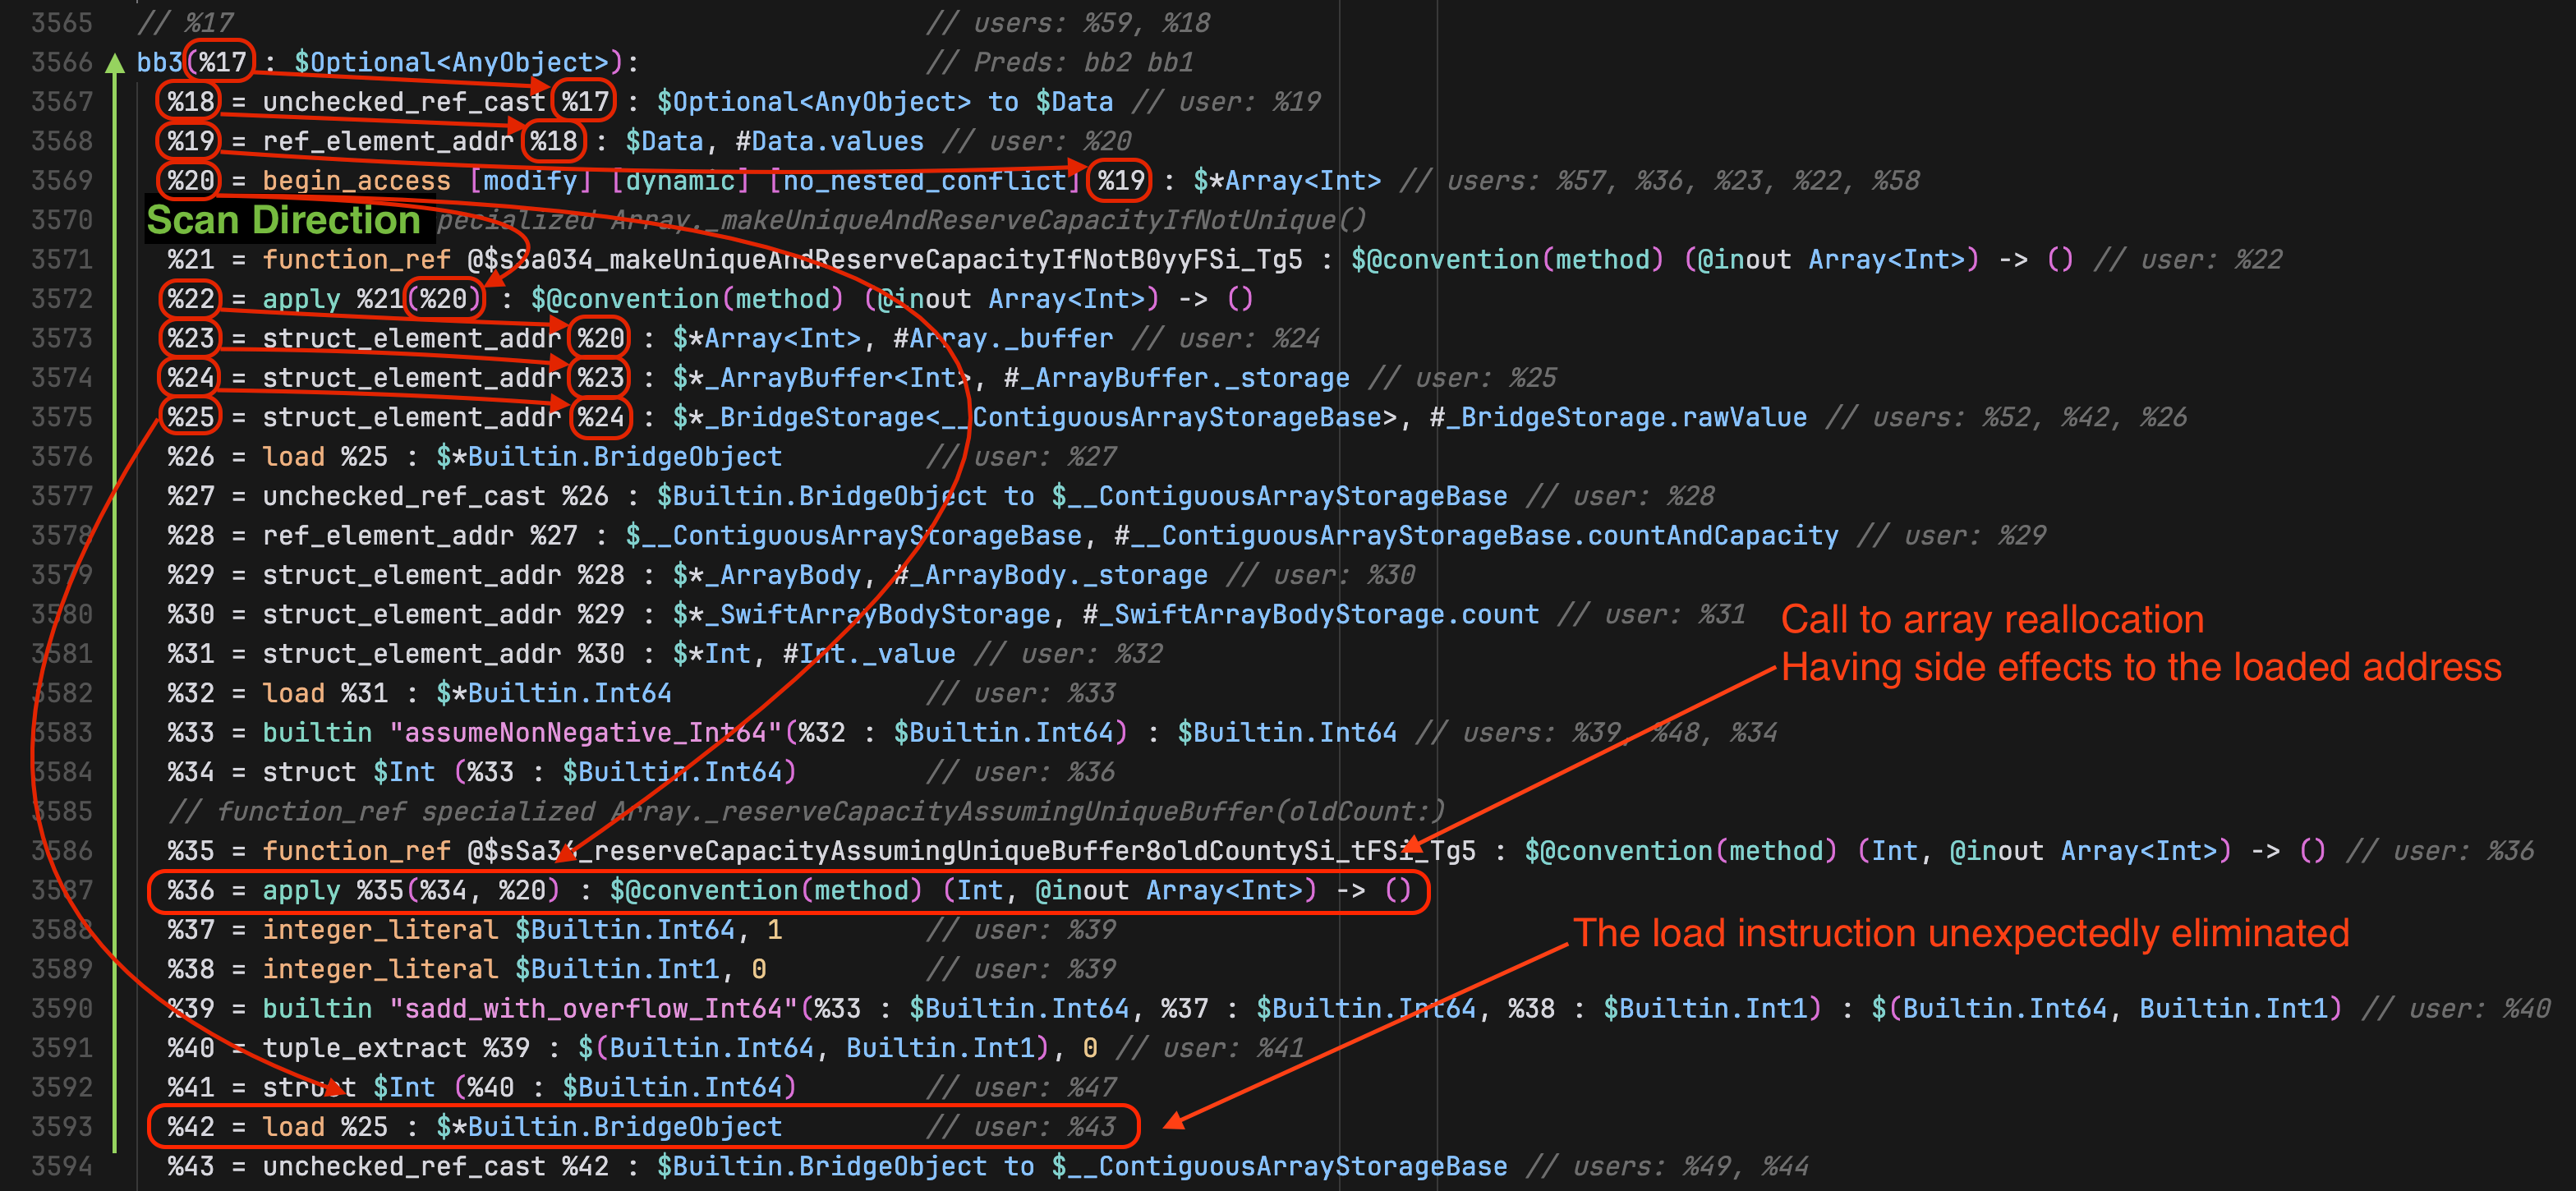
从这些日志中,我们可以清楚地看到 redundant load elimination (冗余 load 指令消除,下称 RLE) 过程删除了以下 load
指令:
sil
%42 = load %25 : $*Builtin.BridgeObject
思考修复方案
要完善修复方案,我们首先需要了解 RLE。这个优化过程通过消除虚拟寄存器和实际寄存器的冗余 "get 和 set" 操作来优化代码。考虑下面这个有关虚拟寄存器的例子:
sil
%1 = load %x%2 = store %1%3 = load %2return %3
一个更优的等效版本会立即返回 %1
,因为 %2
只是一个中间结果。这是 RLE 应该正确处理的情况。这里,我们称之为情况 1。
sil
%1 = load %xreturn %1
然而,考虑这个更复杂的情况:
sil
%1 = load %xcall print(%1)call Foo(%x)%3 = load %x // 我们能消除这一行吗?return %3
在这里,消除 %3 = load %x
取决于 Foo
是否修改了 %x
的内容。如果修改了,我们就不能直接返回 %1
,因为 %3 = load %x
加载了更新后的内容。这里,我们称之为情况 2。
现在我们可以开始看看 Swift 中 RLE 的有关实现了。其入口位于 RedundantLoadElimination.swift
文件:
swift
let redundantLoadElimination = FunctionPass(name: "redundant-load-elimination") {(function: Function, context: FunctionPassContext) ineliminateRedundantLoads(in: function, ignoreArrays: false, context)}
从这个入口点阅读代码,我们发现其算法与经典的 RLE 方法不同:
- 它在每个逆序的基本块中反向迭代所有指令,以查找所有
load
指令 - 对于每个
load
,它检查其先前的指令以查找:- 可用的
store
指令进行优化(对应第一种情况) - 可用的
load
指令进行优化(对应第二种情况),如果当两个load
之间没有对地址有副作用的函数调用的话
- 指令扫描有复杂度预算限制
比较 RLE 与 AutoreleasingUnsafeMutablePointer
和 UnsafeMutablePointer
的详细行为,我们可以获得如下日志:
text
// AutoreleasingUnsafeMutablePointereliminating redundant loads in function: $s8Crashing12ValueStorageC6appendyySiFySAyAA4Data33_A856358C389441A2F6EA224BB743344FLLCGXEfU_...scanning prior instructions for the load: %42 = load %25 : $*Builtin.BridgeObject // users: %52, %43...visiting instruction: %36 = apply %35(%34, %20) : $@convention(method) (Int, @inout Array<Int>) -> ()transparent// %35 = function_ref @$sSa36_reserveCapacityAssumingUniqueBuffer8oldCountySi_tFSi_Tg5 : $@convention(method) (Int, @inout Array<Int>) -> () // user: %36
text
// UnsafeMutablePointereliminating redundant loads in function: $s11NonCrashing12ValueStorageC6appendyySiF...scanning prior instructions for the load: %35 = load %18 : $*Builtin.BridgeObject // users: %45, %36...visiting instruction: %29 = apply %28(%27, %12) : $@convention(method) (Int, @inout Array<Int>) -> ()overwritten// %28 = function_ref @$sSa36_reserveCapacityAssumingUniqueBuffer8oldCountySi_tFSi_Tg5 : $@convention(method) (Int, @inout Array<Int>) -> () // user: %36
这揭示了:
- 使用
AutoreleasingUnsafeMutablePointer
时,RLE 认为数组重新分配函数对load
指令操作数的地址是"透明的",从而启用了 load 指令消除 - 使用
UnsafeMutablePointer
时,RLE 正确地认识到该函数会覆写地址,从而阻止了 load 指令消除
对于情况 2 所属场景,Swift 6 算法检查 load
的所有先前指令,以确定 load
操作数的源和 load
指令本身之间的函数调用的副作用。
在这里,关键的发现是 Swift 编译器仅在 load
操作数的最终源头有未知逃逸结果时才会考虑函数的副作用。通过在 AliasAnalysis.swift
中的函数设置断点,我发现了两种指针类型之间的关键差异:
- 使用
AutoreleasingUnsafeMutablePointer
时,编译器检查load
指令的操作数的定义源是否逃逸。当确定不逃逸时,编译器将错误地假设函数没有副作用。(line 376) - 使用
UnsafeMutablePointer
时,编译器将获取数组重新分配函数的全局副作用(可能来自@_effects
属性。只有标记为readOnly
或readNone
的函数会被视为无副作用。)(line 381)
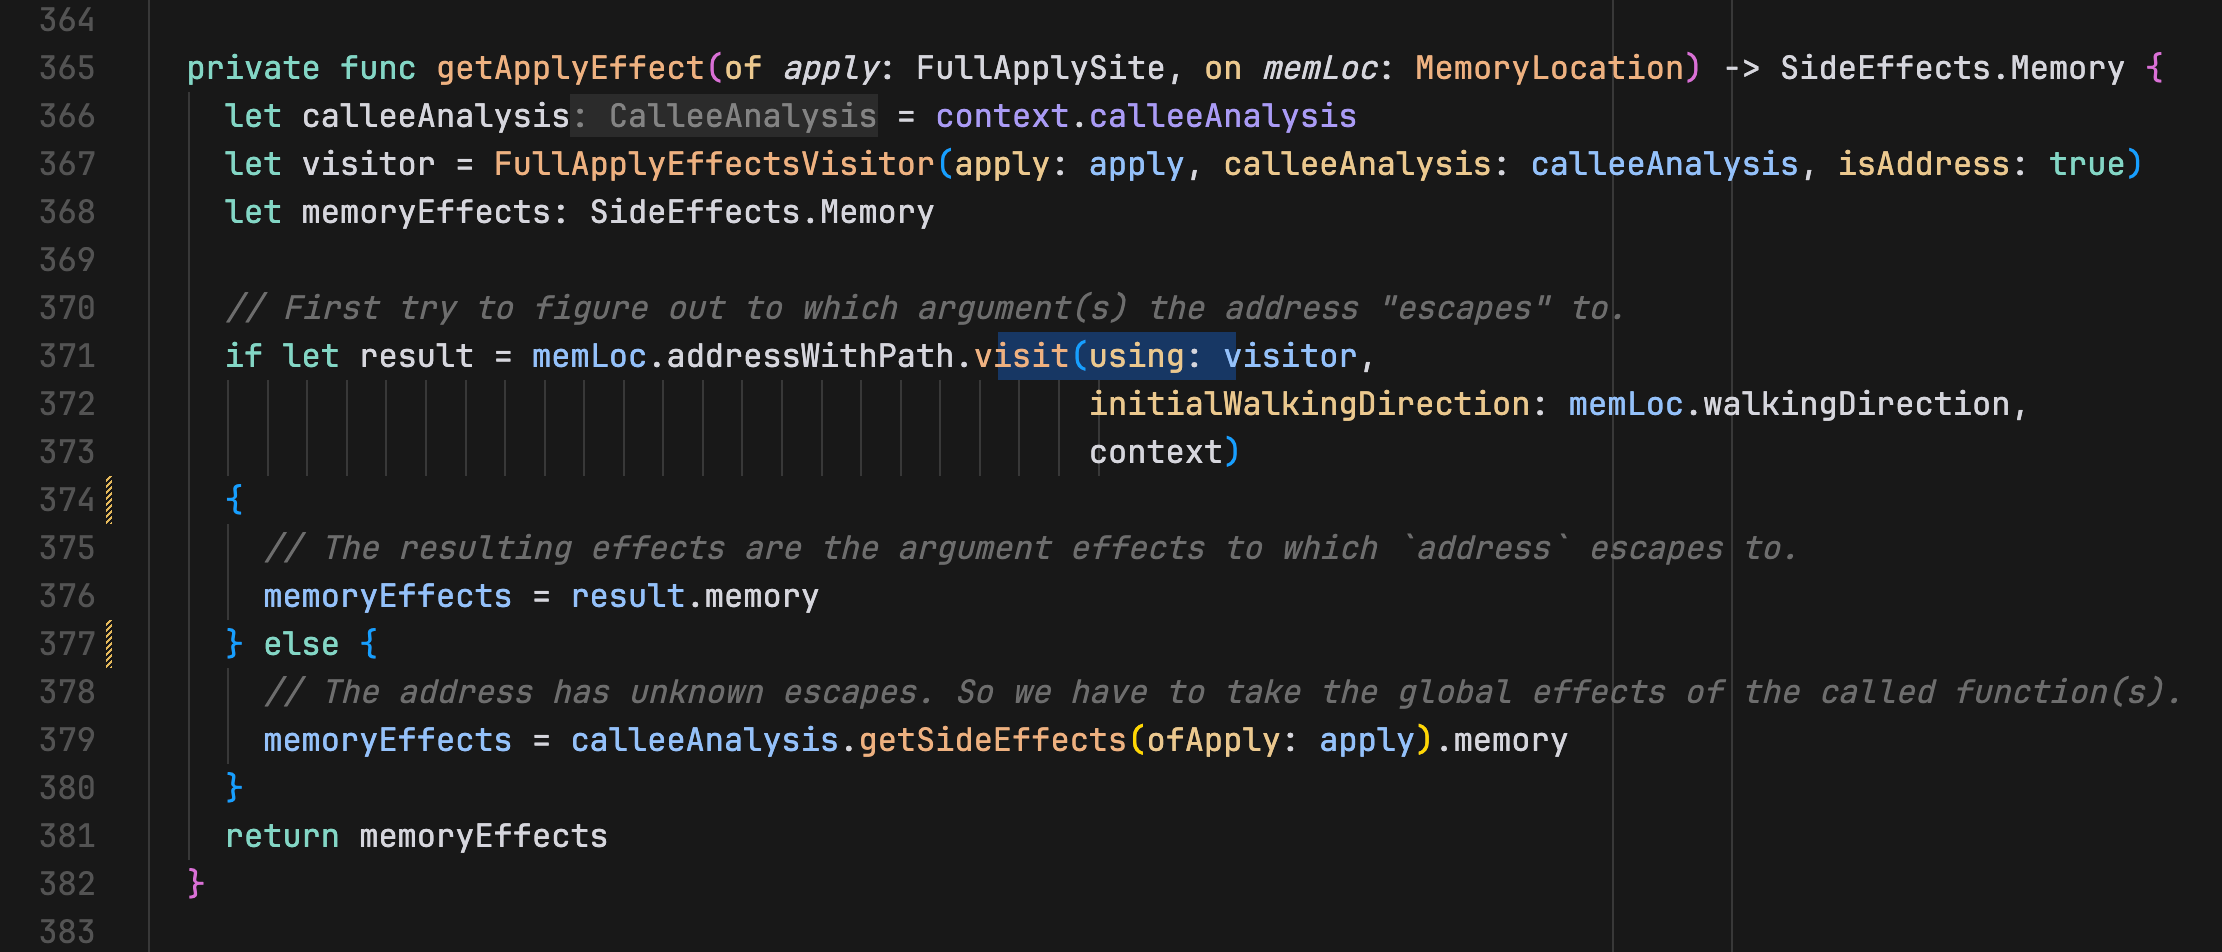
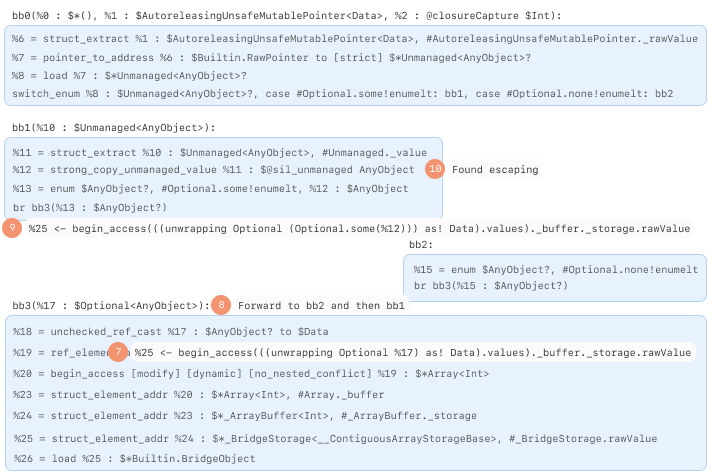
于是我们需要对第 371 行的 visit
函数进行进一步调查。该行会对 load
指令的操作数执行逃逸分析。下图说明了这个过程:
以下是逃逸分析的过程:
- 沿着 use-def chain (使用-定义链) 向上走,分析逃逸行为
- 每一步都将构建一个路径,表示如何从该点推导出
load
指令的操作数
但当我们遇到 AutoreleasingUnsafeMutablePointer
的 pointee
getter 实现时情况会变得复杂。它在上述逃逸分析过程中是一个非平凡的案例:
swift
@frozenpublic struct AutoreleasingUnsafeMutablePointer<Pointee /* TODO : class */>: _Pointer {@inlinablepublic var pointee: Pointee {@_transparent get {// The memory addressed by this pointer contains a non-owning reference,// therefore we *must not* point an `UnsafePointer<AnyObject>` to// it---otherwise we would allow the compiler to assume it has a +1// refcount, enabling some optimizations that wouldn't be valid.//// Instead, we need to load the pointee as a +0 unmanaged reference. For// an extra twist, `Pointee` is allowed (but not required) to be an// optional type, so we actually need to load it as an optional, and// explicitly handle the nil case.let unmanaged =UnsafePointer<Optional<Unmanaged<AnyObject>>>(_rawValue).pointeereturn _unsafeReferenceCast(unmanaged?.takeUnretainedValue(),to: Pointee.self)}...}...}
实现细节揭示,AutoreleasingUnsafeMutablePointer
必须将引用从 Optional<Unmanaged<AnyObject>>
转换为 Pointee
类型以维持 +0 引用计数。这种转换通过 _unsafeReferenceCast
函数执行:
swift
@_transparent@unsafepublic func _unsafeReferenceCast<T, U>(_ x: T, to: U.Type) -> U {return Builtin.castReference(x)}
编译器将其转换为 Builtin.castReference
函数,最终在 SIL 中表示为 unchecked_ref_cast
指令:
sil
%y = unchecked_ref_cast %x : $SourceSILType to $DesintationSILType
因为 AutoreleasingUnsafeMutablePointer
的引入,使得 $SourceSILType
或 $DesintationSILType
可能是 Optional
类型,最终导致了问题:
sil
%y = unchecked_ref_cast %x : $Optional<AnyObject> to $Data
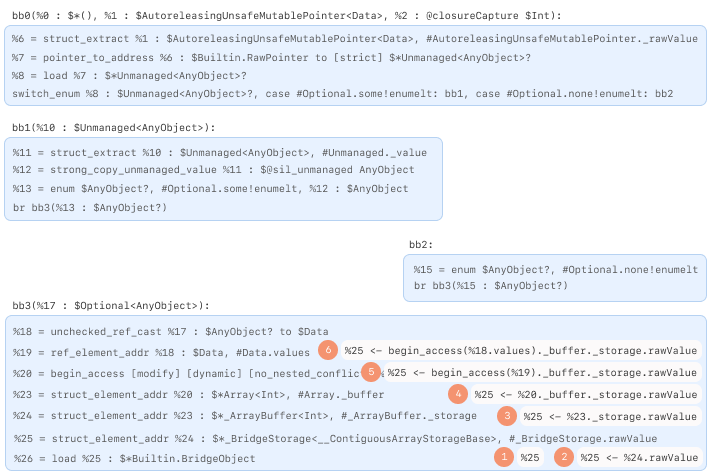
此指令可以在 Optional
和非 Optional
类型之间进行转换,有效地包装或解包值。由于逃逸分析沿着 use-def chain (使用-定义链) 走,路径必须严格反映如何从定义点推导出 load
操作数,这些隐式的 Optional
转换会创建的路径不匹配,如图所示:
通过检查 WalkUtils.swift
中的 walkUpDefault
函数我们可以确认这一假设:该函数在向上走期间处理各种指令类型,但缺乏对 unchecked_ref_cast
中 Optional
转换的适当处理:
swift
public mutating func walkUpDefault(value def: Value, path: Path) -> WalkResult {switch def {...case let urc as UncheckedRefCastInst:if urc.type.isClassExistential || urc.fromInstance.type.isClassExistential {// Sometimes `unchecked_ref_cast` is misused to cast between AnyObject and a class (instead of// init_existential_ref and open_existential_ref).// We need to ignore this because otherwise the path wouldn't contain the right `existential` field kind.return rootDef(value: urc, path: path)}return walkUp(value: urc.fromInstance, path: path)...}}
修复方案
解决方案是在 use-def chain (使用-定义链) 走向上游时考虑 Optional
和非 Optional
类型转换:
swift
public mutating func walkUpDefault(value def: Value, path: Path) -> WalkResult {switch def {...case let urc as UncheckedRefCastInst:if urc.type.isClassExistential || urc.fromInstance.type.isClassExistential {// Sometimes `unchecked_ref_cast` is misused to cast between AnyObject and a class (instead of// init_existential_ref and open_existential_ref).// We need to ignore this because otherwise the path wouldn't contain the right `existential` field kind.return rootDef(value: urc, path: path)}switch (urc.type.isOptional, urc.fromInstance.type.isOptional) {case (true, false):if let path = path.popIfMatches(.enumCase, index: 1) {return walkUp(value: urc.fromInstance, path: path)} else {return unmatchedPath(value: urc.fromInstance, path: path)}case (false, true):return walkUp(value: urc.fromInstance, path: path.push(.enumCase, index: 1))default:return walkUp(value: urc.fromInstance, path: path)}...}}
下图说明了这个修复如何适应逃逸分析过程中的 Optional
和非 Optional
类型转换。当逃逸分析过程遇到 Optional
和非 Optional
类型之间的 unchecked_ref_cast
时,该修复通过调整路径以考虑枚举 case 差异,确保了正确的路径转换。
在 def-use chain (定义-使用链) 分析中,walkDownDefault
函数也需要类似的更改:
swift
public mutating func walkDownDefault(value operand: Operand, path: Path) -> WalkResult {let instruction = operand.instructionswitch instruction {...case let urc as UncheckedRefCastInst:if urc.type.isClassExistential || urc.fromInstance.type.isClassExistential {// Sometimes `unchecked_ref_cast` is misused to cast between AnyObject and a class (instead of// init_existential_ref and open_existential_ref).// We need to ignore this because otherwise the path wouldn't contain the right `existential` field kind.return leafUse(value: operand, path: path)}switch (urc.type.isOptional, urc.fromInstance.type.isOptional) {case (true, false):return walkDownUses(ofValue: operand, path: path.push(.enumCase, index: 1))case (false, true):if let path = path.popIfMatches(.enumCase, index: 1) {return walkDownUses(ofValue: operand, path: path)} else {return unmatchedPath(value: operand, path: path)}default:return walkDownUses(ofValue: operand, path: path)}...}}
实施此修复后,编译使用 AutoreleasingUnsafeMutablePointer
的代码产生的日志显示 RLE 正确识别潜在的副作用:
text
eliminating redundant loads in function: $s8Crashing12ValueStorageC6appendyySiFscanning prior instructions for the load: %45 = load %28 : $*Builtin.BridgeObject // users: %55, %46...visiting instruction: %39 = apply %38(%37, %23) : $@convention(method) (Int, @inout Array<Int>) -> ()overwritten
优化后的 SIL 现在保留了数组重新分配后的关键 load
指令:
sil
// ValueStorage.append(_:)// Isolation: unspecifiedsil [noinline] @$s8Crashing12ValueStorageC6appendyySiF : $@convention(method) (Int, @guaranteed ValueStorage) -> () {[%1: noescape, read c*.v**, write c*.v**, copy c*.v**, destroy c*.v**][global: read,write,copy,destroy,allocate,deinit_barrier]...bb3(%20 : $Optional<AnyObject>):...// function_ref specialized Array._reserveCapacityAssumingUniqueBuffer(oldCount:)%38 = function_ref @$sSa36_reserveCapacityAssumingUniqueBuffer8oldCountySi_tFSi_Tg5 : $@convention(method) (Int, @inout Array<Int>) -> ()%39 = apply %38(%37, %23) : $@convention(method) (Int, @inout Array<Int>) -> ()%45 = load %28 : $*Builtin.BridgeObject...} // end sil function '$s8Crashing12ValueStorageC6appendyySiF'
调试 Swift 编译器的技巧
获取 Swift 编译器的中间产物
要检查 Swift 编译器在每个编译阶段的中间表示:
shell
swiftc YourSwiftSource.swift -Osize -emit-silgen > YourSwiftSource.silgen.sil # 生成原始 SILswiftc YourSwiftSource.swift -Osize -emit-sil > YourSwiftSource.sil.sil # 生成优化 SILswiftc YourSwiftSource.swift -Osize -emit-irgen > YourSwiftSource.irgen.ll # 生成原始 LLVM IRswiftc YourSwiftSource.swift -Osize -emit-ir > YourSwiftSource.ir.ll # 生成优化 LLVM IR
利用 LLVM 传递参数
LLVM 提供了许多可与 Swift 一起使用的传递参数:
shell
# 打印指定函数的 SIL 更改swiftc -Xllvm '--sil-print-function=$MangledSwiftFunctionName'# 在运行每个 SIL 过程前打印其名称swiftc -Xllvm '--sil-print-pass-name=pass-name'# 打印内联到其他函数中的函数swiftc -Xllvm '--sil-print-inlining-callee=true'
构建 Swift 编译器
需要注意的是,在这篇文章中,我们是在调试编译器的行为细节,但 Swift 编程语言和标准库捆绑在一起。由于问题与 Array.append
函数的内联相关,我们应该构建一个 debug 版本的编译器和一个 release 版本的标准库,以确保 Array.append
的内联成本尽可能低。你可以使用以下命令实现:
shell
utils/build-script --no-swift-stdlib-assertions \--skip-ios --skip-tvos --skip-watchos --skip-build-benchmarks
SIL 和 LLVM IR 的语法高亮
你可以在 VS Code(或 Cursor)扩展市场中搜索"WeZZard"以获取相关 IDE 中的 SIL 语法高亮。
你可以在 VS Code(或 Cursor)扩展市场中找到 Ingvar Stepanyan 的"LLVM"扩展,以获取相关 IDE 中的 LLVM IR 语法高亮。